Hey there, fellow DIY enthusiasts and garden gurus! Tired of fumbling for a flashlight every time you need something from your shed? Wishing you could actually see your gardening tools instead of tripping over them? Well, say goodbye to darkness and hello to the power of the sun! Adding solar power to your shed is easier than you think, and I’m here to guide you through every step of the way.
Why Solar Power is the Perfect Shed Partner
Let’s face it, running electrical wiring to your shed can be a real pain. Digging trenches, dealing with permits, and the sheer cost can make you want to give up before you even start. That’s where solar power swoops in to save the day! Here’s why solar is a match made in heaven for your shed:
- Eco-Friendly Energy: Harnessing the power of the sun is clean, green, and reduces your carbon footprint. Feel good knowing your shed is powered by nature!
- Whisper-Quiet Operation: No more noisy generators disturbing the peace of your garden. Solar panels are silent operators, letting you enjoy the sounds of nature.
- Low-Maintenance Marvel: Once installed, solar panels require minimal upkeep. A quick spray with the garden hose a couple of times a year is all it takes!
- Long-Lasting Power: High-quality solar kits come with warranties that can last for decades, potentially outliving your shed itself!
- Cost-Effective Solution: While the initial investment might seem daunting, solar power can save you money in the long run by slashing your electricity bills.

Choosing the Right Solar Setup: Kits vs. Portable Power Stations
Now that you’re sold on the brilliance of solar, let’s explore your options. You can either opt for a comprehensive solar kit or a convenient portable power station.
Solar Kits: The All-Inclusive Powerhouse
Solar kits are like the pre-assembled furniture of the solar world – they come with everything you need to get your shed up and running on sunshine. Here’s a breakdown of the essential components:
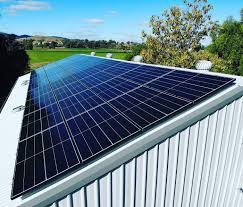
- Solar Panels (The Energy Collectors): These photovoltaic (PV) panels are the stars of the show, capturing sunlight and converting it into usable electrical energy.
- Storage Battery (The Power Bank): Batteries store the energy generated by the panels, ensuring you have power even when the sun isn’t shining.
- Charge Controller (The Energy Regulator): This clever device prevents overcharging and discharging of the battery, extending its lifespan and optimizing performance.
- Inverter (The Current Converter): The inverter transforms the direct current (DC) stored in the battery into alternating current (AC), which is what most household appliances and tools use.
- Cables, Connectors, and Accessories (The Connecting Links): These essential components ensure everything is properly connected and functioning seamlessly.
Portable Power Stations: Compact and Convenient Power On-the-Go
If you’re looking for a more portable and budget-friendly option, solar generators, also known as portable power stations, are a fantastic choice. These compact units feature solar panels that charge a portable battery pack, which you can then use to power your tools and lights.
Choosing the Right Option for Your Needs
Deciding between a solar kit and a portable power station depends on your specific needs and budget.
- Go for a solar kit if: You need a permanent power solution for your shed, plan on running multiple devices simultaneously, and want a system that requires minimal hands-on management.
- Opt for a portable power station if: You need a more affordable and portable solution, only require power for a few devices at a time, and don’t mind occasionally recharging the battery.

Installing Your Solar Setup: A Step-by-Step Guide
Ready to roll up your sleeves and embrace your inner electrician? Installing a solar kit is a manageable DIY project, but safety always comes first! If you’re unsure about any aspect of the installation, don’t hesitate to consult a qualified electrician.
Before You Begin:
- Check Local Regulations: Some areas require permits for solar installations, so contact your local building department to ensure you’re in compliance.
- Gather Your Tools: You’ll need basic tools like a drill, screwdriver, wire strippers, and a level.
- Safety First: Always wear appropriate safety gear, including gloves and eye protection.
Installation Steps:
- Plan Your Layout: Determine the best location for your solar panels (ideally south-facing for maximum sun exposure) and your power distribution center (inverter, battery, and controller).
- Mount the Components: Securely mount the solar panels to your shed roof using appropriate mounting brackets. Inside the shed, install the power distribution components on a sturdy wall or shelf.
- Wire the Shed: If you’re adding lights and outlets, run the necessary wiring before connecting them to the power distribution center.
- Connect the Solar Panels: Drill a hole in your shed wall and install a waterproof entry panel to protect the cables running between the solar panels and the power center. Connect the panels to the charge controller.
- Connect the Battery and Inverter: Connect the battery to the charge controller and the inverter to the battery. Ensure all connections are secure and properly insulated.
- Double-Check Your Work: Before flipping the switch, carefully review all connections and consult the manufacturer’s instructions to ensure everything is correctly installed.
- Power Up and Enjoy: Once you’re confident in your installation, connect the system to your shed’s electrical panel and bask in the glow of your very own solar-powered haven!

Maintaining Your Solar Oasis: Keeping the Sunshine Flowing
One of the best things about solar power is its low-maintenance nature. However, a little TLC goes a long way in ensuring your system runs smoothly for years to come.
- Keep it Clean: Dust, dirt, and debris can accumulate on solar panels, reducing their efficiency. Give them a quick spray with a garden hose every few months, or more often if you live in a dusty area.
- Remove Snow and Ice: While solar panels can still generate some power in snowy conditions, it’s best to remove any significant accumulation of snow or ice to maximize their output.
- Monitor Battery Health: Batteries have a limited lifespan, so it’s essential to monitor their health and replace them when necessary. Most charge controllers have indicators that provide information about battery status.
- Schedule Professional Inspections: While regular cleaning and maintenance are usually sufficient, it’s a good idea to have your solar system professionally inspected every few years to identify any potential issues early on.

Embrace the Power of the Sun: Illuminate Your Shed and Your Life
Adding solar power to your shed is a rewarding investment that not only brightens your outdoor space but also reduces your environmental impact and saves you money in the long run. With a little planning, some DIY spirit, and this comprehensive guide, you’ll be well on your way to enjoying the countless benefits of solar-powered bliss!